Pages

Sunday, June 13, 2010

New Blog

I wasn't happy with the title of my blog, or the layout, so I decided to re-do it.  I made the mistake of clicking create when trying to find an available name and thus I ended up with a totally new blog, rather then just changing the name of this one (you can't delete blogs straight away, it keeps them around for a while in case you change your mind).

So my blog has moved to... http://daves-home-cooking.blogspot.com/

Thursday, June 10, 2010

Silverside

We often buy Corned Silverside from Coles Online because it's cheap and yummy!  And we can use the leftovers for sandwiches for the rest of the week.  They are also very easy to cook.  Here's the method I use:

Ingredients
1 Corned Silverside
1 tbspn brown sugar
10 cloves
1 sprig rosemary
1 chilli, roughly chopped
1 onion, roughly chopped
1/4 cup malt vinegar

Place the silverside into a large pot and add all other ingredients.  Then add water until the silverside is covered.  Bring to the boil, then reduce to a low heat and cook for at least 30 mins per 500g.  Just make sure the silverside is always covered with water and it will turn out nice and tender.  Serve with white sauce and vegies.  Enjoy!

Wednesday, June 9, 2010

Beef Topside Roast

Last night we had a lovely roast dinner.  I'd looked at a couple of different recipes I found on the net and decided to improvise a little with the ingredients I had.  Normally I just rub the roast with some oil and leave it at that.


Ingredients

Spice Rub
Handful of peppercorns
Handful of fresh oregano
1 tbspn dried basil
2 tspn crushed garlic
1 tsp dijon mustard
1 tbspn soy sauce

Beef Topside
Olive Oil

2 large Potatoes
1 tbspn finely chopped fresh rosemary
2 pieces pumpkin
2 large carrots
2 pieces sweet potato

Preheat oven to 200°C.  Grind the peppercorns with a mortar and pestle. Add the other ingredients and mix it all into a smooth paste.  Rub some olive oil all over the topside and then do the same with the spice mix.  Place the roast in a roasting pan and cook for 30 mins per 500g.  Use a meat thermometer if you're not sure how long to cook it for, they're great!  I also found a "Meat Doneness Chart" which can help as well.

For the potatoes... I've never had much luck getting my potatoes to be nice and crunchy on the outside and soft and fluffy on the inside.  Sometimes it works, sometimes it doesn't.  So I found some tips on a few different sites and came up with this method.

Peel potatoes and cut them in halves.  Pop them in some boiling salted water for about 5 minutes.  Remove and empty water from pot, then place potatoes back into the pot and place back over the heat for a few minutes, stirring the whole time.  This dries them out.  Chop some rosemary and rub over the potatoes.  Put some vegetable oil in an oven proof dish, just a little for the potatoes to sit in, and place in the oven for about 5 minutes until the oil heats up.  Then place the potatoes carefully into the oil.  Cook them for about 30-40 minutes, turning every 10 minutes.  Apparently it's better if your oven is very hot, although I left mine at 200°C as I was still cooking the roast and they still turned out great!

I also had some pumpkin roasting with the potatoes, and steamed some carrots and sweet potatoes.  To make the gravy, I melt a good tbspn of butter in a pot, add some chopped mushrooms and saute them for a few minutes.  Add a heaped tablespoon of flour and stir well for 1 minute.  Then add some stock or some drippings from the roast if you have any.  I just used stock, about 1 1/2 cups.  Stir that over a low heat until it's nice and thick.


Serve with a nice bottle of red.  This particular wine we purchased from Rumbalara Estate Wines.  It's our favorite at the moment.

Monday, June 7, 2010

Beef Hedgehogs

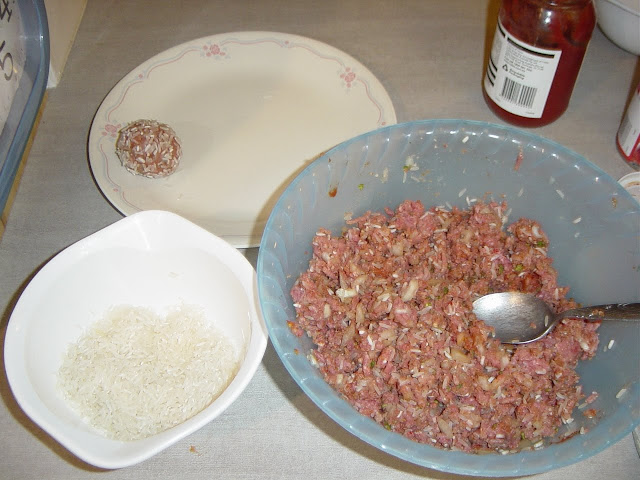
I usually make Meatballs with Spaghetti, and Teena really loves them!  Last night I decided to try something different though.  Mum asked me the other day if I remembered when she used to make Hedgehogs with beef mince and rice, and I did though I couldn't remember the recipe exactly.  So I decided to use my Meatballs and Spaghetti recipe and just modify it a little.


Ingredients
  • 500g beef mince
  • 1 onion, chopped finely
  • 1 tbspn lemon juice
  • 1/2 cup fresh white breadcrumbs
  • 1/3 cup basil leaves, finely chopped
  • 2 x 400g cans diced tomatoes
  • 2 tbspn tomato paste
  • 2 tspn hot chilli sauce
  • 2 cups beef stock
  • 1 cup uncooked white rice
  • Salt and pepper

1.  Combine mince, onion, 1 tbspn tomato paste, 1 tspn chilli sauce, lemon juice, breadcrumbs, basil, half the rice and salt and pepper in a large bowl. Shape a small handful of the mixture into balls and then roll them in a bowl filled with the extra rice.  Place meatballs on a tray and place in the refrigerator while you prepare the sauce.

2.  Combine tomatoes, 1 tbspn tomato paste, 1 tspn chilli sauce and stock in a deep frying pan. Slowly bring to the boil and then drop meatballs into the sauce.  Reduce heat and simmer, covered, for 25 to 30 minutes or until meatballs are cooked through and the rice is tender.  Serve.

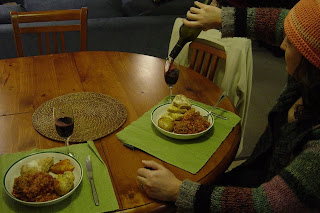
I only used 1 cup of stock but the rice absorbed too much liquid and I had to add another during cooking.  So I added another cup to the recipe above.  Some of the meatballs fell apart when I tried to turn so you could an egg to the mix to help hold it together if you wanted to.  These are a meal on their own really, but we served ours with some roasted potato, sweet potato, left over damper and a glass of red wine.  Delicious!

Friday, June 4, 2010

Herb Damper

My Sister used to make this damper all the time.  It's so tasty and easy to make that I often make one to go with some soup, risotto or Spaghetti Bolognaise.  You can use any herbs you have available.  I've made different ones with Sage, Basil, Garlic, Chilli.  I don't usually have lemon pepper seasoning either, so you can skip that or just add some black pepper.

Ingredients
  • 2 cups self-raising flour
  • 1 tbspn butter 
  • 1 bunch chives, finely chopped
  • 1 tsp lemon pepper seasoning
  • 1/3 cup Parmesan cheese
  • 3/4 cup milk
  • 1 cap-full of white vinegar
1.  Preheat oven to 200°C.  Sift flour into a bowl.  Using your fingertips, rub butter into flour until mixture resembles fine breadcrumbs.  Stir in chives, lemon pepper and Parmesan.

2.  Combine milk and vinegar, add to flour.  Mix lightly until mixture starts to come together (add a little extra milk if necessary). Turn dough onto a lightly floured surface, knead lightly. Shape into a 3cm-thick round and place on an oven tray.

3.  Score top of damper with a knife into wedges. Dust lightly with a little flour. Bake for about 20 minutes or until damper is light golden.

Wednesday, June 2, 2010

Chicken and Vegetable Soup

After making a batch of Hot and Honeyed Chicken Wings, I had a handful of left over chicken wing tips.  Not wanting to waste them, I decided to try some Chicken and Vege Soup.  I hadn't made this soup before, but soups are very easy to make and always taste delicious!

Ingredients
Chicken - Use whatever you have.
As many different vegetables as you have available such as:
Potato, sweet potato, pumpkin, onion, celery, carrot.
Tin of white beans
Garlic
Oil for frying
4 Cups of chicken or vegetable stock

In a large soup pot, heat oil over medium heat.  Fry onion and garlic until soft.  Add rest of vegetables and stir well for a few minutes.  Add stock and white beans, bring to the boil.  Reduce heat and simmer covered for about 1 hour or until all vegetables are soft.  If you used chicken wing tips you can remove them now or if you used anything else with bones such as legs, you can remove the meat from the bones, roughly chop and stir through soup.

Tuesday, June 1, 2010

Spicy Pumpkin Soup

Winter is here, and what's the best food to eat when it's cold?  Soup of course!  The good thing about soups is that you can put just about anything into them and they are so easy to make.  One of my favorite soup recipes is this Pumpkin Soup.  The combination of spices just seem to go so well with the pumpkin.

Ingredients
Olive Oil for frying
1 Onion
2-3 Hot Chillies
1 tsp crushed Garlic
1 tsp ground Cumin
1/2 tsp ground Coriander
1/2 tsp Nutmeg
1 kg Pumpkin, cut into small pieces
4 Cups Vegetable Stock
Shredded Coconut

Finely chop onion and chillies.  Heat oil in a deep soup pot and fry onion, chillies and garlic until soft.  Add spices and stir for another minute.  Add pumpkin and stir to coat with spices.  Add stock and bring to the boil.  Simmer, covered for 30 minutes or until the pumpkin is soft.  Use a hand blender if you like a smooth consistency or just use a potato masher if you prefer a chunkier soup.  You can thin the soup if you like with some milk or cream.  Stir in a handful of shredded coconut and serve with some hot damper!

Hot and Honeyed Chicken Wings

I found this recipe a long time ago when I was really into chillies, mostly because I had a couple of chilli bushes that were loaded with fruit all the time and needed to find different ways to use them.  I'd already made some hot chilli sauce with a batch of them and decided to try these chicken wings using the sauce.  You can read more about the sauce on Teena's blog here.

You don't need to worry too much about quantities here, as long as you have enough to coat the chicken wings thoroughly.  Just remember that there isn't a lot of meat on the wings and they tend to disappear fast!


Ingredients
1kg Chicken Wings
1 Cup Sweet Chilli Sauce
1-2 Tablespoons Hot Chilli Sauce
1/2 Cup Honey
1/3 Cup Soy Sauce
2 Teaspoons Dijon-style mustard
3 Tablespoons Vegetable Oil
Grated Ginger

Preheat oven to 180°C.
Cut off and discard the wing tips (or keep them and make some delicious Chicken and Vegetable Soup!).  Cut each wing in half at joint.
Combine the rest of the ingredients in an ovenproof bowl and mix well. Add chicken wings, be sure to coat them as much as possible. Cover and refrigerate overnight if possible.  Bake 40-45 minutes or until brown turning half way through.  Be careful as the wing tips can burn easily.  Enjoy!

Friday, February 19, 2010

Valentines Day - The Day Before

This Valentines Day, Teena and I decided to stay home and cook our own food rather than going out and having an overpriced meal somewhere.  So we planned what we were going to make and made sure we had all the ingredients ready to go. 

We made a couple of things the day before, so we could take it easy on the actual day.  The first thing we wanted to make was a savory pull-apart.  I made the dough in our bread machine, because it's just so easy!  Then I divided the mix into about a dozen or so pieces and flattened them out a little bit.  We mixed some capsicum, tomato, chili, garlic and herbs together in a bowl, then layered the dough and tomato mix in a pan.  We used a round cake tin as that's all we had available.  The top layer of dough, we shaped into love hearts and brushed them with oil. 


It turned out rather well in the end, and was delicious!  We'll probably make this again using different ingredients.  You could add almost anything to it really.


As the pull-apart was baking, we made some Lemon Mrytle Biscotti and Rose Water Biscuits.  The Biscotti was much the same as my Almond Biscotti except with Pistachios instead of almonds. We had wanted to shape them into love hearts, but realised that wasn't going to work.  The Pistachios took a while to de-shell, but they tasted great!  We decided we couldn't really taste the Lemon Myrtle though.  Not sure why, perhaps we didn't add enough? 

The Rose Water Biscuits turned out really well.  We used a cookie cutter to shape them into love hearts and Teena sprinkled some pink sugar over the top to finish them off.  They are a bit messy but easy to make, and taste great!

While the biscuits were cooking, I also had an eggplant wrapped in foil sitting in the oven.  This was for a recipe I found somewhere on the net a while ago (can't remember where), called Poor Man's Caviar.  Here's the recipe:

Poor Man's Caviar as a spread or dip.
* 2 (1-pound) eggplants
* 2 tablespoons olive oil
* 1 1/2 cups finely chopped onion
* 1 cup finely chopped green bell pepper
* 1 cup finely chopped red bell pepper
* 3 garlic cloves, minced
* 1/3 cup chopped fresh parsley
* 1 tablespoon sugar
* 2 tablespoons tomato paste
* 2 tablespoons lemon juice
* 1 teaspoon salt
* 1 teaspoon dried basil
* 1/8 teaspoon pepper
* 1 (16-ounce) can crushed tomatoes, undrained


Preheat oven to 400°.
Pierce eggplants with a fork; place on a foil-lined baking sheet. Bake at 400° for 45 minutes or until tender. Let cool slightly; peel and finely chop. Place eggplant in a colander; let drain.
Heat oil in a large nonstick skillet over medium-high heat. Add onion, bell peppers, and garlic, and saute 8 minutes or until tender. Stir in eggplant, parsley, and remaining ingredients. Cover, reduce heat, and simmer 1 hour, stirring occasionally.

You can serve chilled or warm it using vegetables, bread or chips.


We didn't follow it exactly as we only had one eggplant and half a capsicum, but it still tasted great with the corn chips we had in the cupboard.

The last thing we made was some Hollandaise Sauce which we put into a jar in the fridge so we could use it the next day.  However, that left us with some left over egg whites.. so Teena whipped up some pink Meringues (actually I did the whipping!).  I won't post those here though, you can check out Teena's blog if you want to see how they turned out.

Sunday, February 7, 2010

Glass Fusing

Teena's father gave her a glass fusing kit which has a microwave kiln in it.  The kiln, pictured here, can be put in a microwave and it reaches temperatures hot enough to melt the glass.  We were a bit apprehensive at first, but this weekend we decided to give it a go. The kit we have comes with some different coloured glass and other little bits and pieces which you can combine to make some interesting items.  

Our first attempt... exploded.  Not a huge, blow up the microwave type of explosion, but the glass ended up in a couple of pieces inside the kiln.  Much like this one which exploded later, after we'd already had a few successful attempts.  We're not sure why it exploded, we think it might have had some residue or something on it or it went in for too long.


This is what it looks like when it comes out of the microwave.  As you can see the glass is red hot, apparently the temperature inside the kiln can reach up to 1600 °F or 871 °C!  Surprisingly the temperature on the outside of the kiln is only warm to the touch, though I still wore the safety gloves provided.  It only takes a couple of minutes for the glass to fuse.  We checked it quickly after 2 1/2 minutes by lifting the lid on the kiln.  If it needed more time we would give it another 30 seconds and check it again.  That's the method that gave us the most success anyway.


And here is the end result. 


There's not much more we can do with these.  They need to be buffed and polished to remove all the sharp edges and shape them but you need a grinding/polishing wheel or something to do that properly.  Then you can either glue some hooks on them or try and drill holes to turn them into pendants or some other little trinket.
  
    Overall it was fun creating new designs and fusing them in the microwave.  Previously you would have needed an expensive kiln, but this little device makes it possible for anyone to fuse glass at home.  However it's a very time consuming process.  You can only do one item at a time, then you have to wait about 40 minutes until the kiln has cooled down before you can fire another one.  So if you wanted to make things to sell at the markets or on eBay, i'm not sure if it would be worth it based on the amount of time you would have to invest in the process.  Also the kiln is showing signs of wear already, there are a couple of hairline cracks on the inside and the base has a few chips in it after only a few days of use.  I'm not sure how long it would last if you were using it frequently.  It might be more suited to making some interesting gifts now and again for friends and family.

Friday, February 5, 2010

Almond Biscotti

We have a heap of almonds sitting in the cupboard, Teena bought them when they were on special.  So the other day I was searching the net trying to find something to make with them and I came across this recipe from one of my favorite sites, Taste.com.au. 

I'd never made Biscotti before although I'd seen pictures and thought it would have been difficult!  Well turns out it's easy, you just mix the ingredients together, form it into a log and bake it for about 20 minutes.  Then you cut it into thin slices and put it back in the oven to make them crisp.  The hardest part for me was cutting the log into thin slices.  I tried a couple of different knives, the serrated edge knives worked the best, but it's still hard work!

The end result was delicious!  We want to make some more soon with different ingredients, maybe Pistachio or Macadamia and Lemon Myrtle (which we have growing in the courtyard).